Barnominium

Barnominium
Showing posts with label DIY. Show all posts

Tuesday, February 6, 2018

Kitchen Renovation

This kitchen in the house, that we finally bought, after looking at 25 houses!  I think, I may have been really tired of looking, because I didn't catch a couple of things.  But it would not have mattered really, because the house was in pretty good shape and the area of town that we wanted.


I just walked in and said, oh, I least this one has been updated....... We had looked at some with metal cabinets, or just old cabinets.  Someone had extended that tile backsplash down for the countertop.  But, down there in the corner where that microwave is, it was completely different tile!

And while we were sitting in the floor scrubbing grout, my daughter says, why is that door so dark.  The one under the sink.  I couldn't believe it.  Everything is raised panel doors and that one was a flat panel.


                                                    Who knew, that the grout was white.......


We had decided that we wanted to paint them white.  Off to Lowes to look at cabinets in stock to see if we could find a color that we liked. Then we went and picked out paint chips to find something close.  We used Valspar w/primer.  When you take your doors off, number them, so they can be put back in the right spot.  I did a light sanding before we painted.


 We had painted all the cabinets.  When you looked inside the cabinets, some of the sides seemed to be off.  My husband decided he just couldn't wait to get granite counter tops. When, we got an estimate for the granite, the guy mentioned that he hoped we could get the counter tops off without tearing up the cabinets.  We did, but then I could see why things looked weird.  I told hubs, we are not putting granite on this junk.  So, every bottom cabinet on that side came out.


 And it really was a good thing, because the wall had been patched back there and not very well.  We tore more sheet rock off and put in wall insulation around all those water lines.


                            At least we shut the door to the mice that had been coming in through there.


                               Back to Lowes for base cabinets and another gallon of the cabinet paint.


I guess this is the only picture that I took of new cabinets going back in.  This was not an easy task.  Shims, shims and shims to make everything level from the front to back and side to side.


Here is the finished product.  We went with the granite over the washer/dryer adding more countertop space.


There was some little crappy trim across the top of the cabinets that came down.  And I replaced it with chair rail.  I looked all over for something different, but nothing that would work was to be found.


                                                            It Turned out great!

Tuesday, January 30, 2018

Canvas Painting

My daughter, Brianna decided she wanted a Large abstract painting for her study......And she asked me paint one for her.  I do not consider myself an artist of this type, although I have painted a few pieces.  I thought it would be fun!

This was the inspiration piece!


Since, I really am not an artist, I am sorry, I can't give instructions on how I did it.  People get all torn up about messing something up.  It is just Paint!  It will dry and if you don't like it, paint over again.  I can say, DO paint your whole canvas in a base color first.  I didn't do this and I knew better!  You do want several shades of the colors that you plan to use, PLUS White.  The darker tones, lighter tones give contrast and depth to your painting. The white you can mix with your colors for lighter colors.


 You have to start somewhere, so I just started out putting colors here and there.

                         I didn't like the tan color.......So it got covered up.

  Some things changed along the way.  That is what is great about paint.  Do you see the gold hands?  My daughter called it a claw......!!  I ended up adding a lot of white of gold to the bottom of it.  You can see the change in the final picture.


I couldn't get the gold, the color of gold that I was looking for.  It was redone several times.  You see below is lighter. The red got more layers of red.


The gold paint pen in the picture above, I used to draw lines adding detail.

  Then, I just played, adding layers of color, lines of color, I had to fix a little bump that I popped off!  I added little lines of Red & Gold using a Gold paint pen.


Here is the finished product.  I hung it on my wall for a few days, so I could decide IF I was done with it.  I think I am happy with it! I know....Not really like the inspiration piece.  I needed flow and movement.  When you paint just go with what you are feeling. 

As, I worked on this painting, I thought about how the painting is kinda like life.  This painting has many layers, and life is made up of many layers, some we like and some we don't.  With the painting,  it was very simple to let it dry and paint over it.  I dabbled till I was happy.  In life, we all make mistakes!  Some worse than others.  Some are forgotten, and some are remembered forever.  All you can do, is DO better, Be Better and Don't make the same mistake again.  Mistakes is what makes us grow into the person we become.  We have to keep trying to get Us the way we want to be.  We are all God's children and he will keep working with us until he is happy, IF we want him to be our artist.

I do NOT know where all that came from, but felt the need to pass the message on.


Have FUN!  STEP out of the box or mold that you have put yourself in!

Sunday, December 18, 2016

Toy Soldier Christmas Ornaments


I hope everyone is ready for Christmas.  I really do NOT know where my time has gone! But, I thought I would do a quick post this morning before heading out to church. It is last minute, but with kids being home for the holidays, It would be a fun project for them to do.

I think I learned to make these ornaments in 8th grade. And, I still have them on my tree!  I actually love them.


Supplies: Old Fashioned Clothes Pins

                Red Pom Poms

                Flat gold  cord

                Red & White or Blue Paint

                Red Pipe cleaners

                Magic marker for face

                Glue 


First Paint your clothes & Let Dry, Paint the top red, and the pants either White or Blue           

Attach gold cord, This can be done in one piece.  It will glue better, just play with it.

Glue on his hat, arms.  Draw his face and your done

An ornament hanger will attach to his hat, or you can stand him on a branch!


                      MERRY CHRISTMAS!!!!!! 


Wednesday, August 17, 2016

A Bathroom Update, Zero Cost!

It ALWAYS amazes me, how basically Just Paint can change a room.  I know that is funny.  I know it makes a big difference, but then I paint....and well it is a Wow moment or it could be, What was I thinking???? 


We have a small bathroom upstairs on the girls side of the house, (their gone, but it is still their side).  There was nothing wrong with it, but after awhile you just need change.  And, we needed something more grown up.


Here is the before.....Actually I painted this and I really liked it.  But, after just the initial coat of peach, it was one those, What was I thinking.  So, I drizzled orange craft paint into the can of peach and did a dry brush technique.   I just kept working with it, till I liked it.


When we purchased this place, It was a wreck!  Where the built ins are, was just a hole and you could see A/C duct work going up to the attic.

]


I didn't really have a plan for this room.  I really feel that ivory fixtures limit the possibilities.  For example, I don't think gray walls with ivory/tan would look good.  I knew I wanted something neutral.  Just happens I had extra paint in an off white....It was whiter than I wanted, So I added some brown craft paint to the can.  Not a problem, if you remember that you did that....Recently I painted another small room  and I thought...that I had enough paint in a can (I forgot I had used it upstairs) .  Guess what? It wasn't enough paint.  I purchased some more and then I was trying to figure out why it didn't match.  Then, I remembered!!


 So now that it was beige, I needed new accessories.  I went shopping in my house!  Yes, sometimes things can be moved around to different rooms and it looks like you have new things.  

The shower curtain came out the main bath downstairs (I really had to shop for new one to go there)

The picture came from down stairs, the cowboy lantern came out my daughters room


 And this little cute sign, came out of my daughters closet.  Yep, she is gone, but for some reason she still has things here.  Her closet is good place to go look....She came home one weekend and I had hung one of her pictures in the hall.  She said, "Hey, that is my Picture."  I said, "Yes, it is, No difference in it being in a closet or on the wall." 


My daughter, Megan, made the wooden sign.

That is it!  A room make over at $0 cost.  I had everything, that I used.


Tuesday, August 16, 2016

Wood Signs

Oh my Goodness!  I know......It has been forever since I have posted anything.  I promise you that I have been busy.  I've spent the last two nights uploading pictures from the phone to the computer. 

One of those things is Wooden Signs made out of scrape lumber...

I can tell you....These are not my originals thoughts!  Pinterest is my best friend!


I thought this was REAL cute.  Brianna has been dating Danny now for 1 year and she was wanting a collage to go over the couch in her new apartment.


I used thin strips of wood to attach wood planks together.  To paint, I used painters tape and lined out my tress.  Then I tore pieces and placed in the center to make it look like bark.  After, I painted the tree, I pulled all the tape up.  The....boyfriend loved it and said it made him want to find a tree to really carve their initials in......AWE!  He is a keeper!


 Have you ever blown a dandelion?


 More Scrapes!  I really don't know what the L is made out of....They were in my stock.  The O is made out of a piece of Tree Bark, and dry washed in White. The V is obviously a chain.  The E is Vine.  I LOVE IT!


Back to the collage....Thought we may need some fill in's......Not knowing exactly what we were going to use.  I painted several colors on the board and ran my electric sander over it.


She LOVES Arrows!  Another fill in...


Here it is!  OH I did that Believe sign as well!

I got the frames up and she had to print out some pictures to go in them.


Another sign that I made for me!


Ok, the EASIEST way that I have found to do signs.  Print out your words.  Then take chalk and cover the back of the writing.  Place the paper on your wood, or whatever your using and trace with a pencil.  The chalk will transfer to your wood and then you can paint.  I have found that the paint Pens make it so much easier!


 Color the back!


See how it transfers!  Happy sign making!  Comment and let me know that you were here!


Tuesday, January 12, 2016

Jewelry Holders

After making my daughter a bracelet holder, I got in the mood to do something else.  My necklaces have hung on the corners of the mirror on my dresser forever.......I had seen on old rake head used to hang necklaces.  I just happened to have one. 


I used a wire brush to knock some of the rust off of it and then hit it with some Gold spray paint.  I used Hot glue to cover the handle with some rope.  And Done!  Hang it up!  


LOL! My husband came in and said, "Someone has hung an old rake up in the bathroom."

 Now, I am thinking that I need some new necklaces!

 I had to take some pictures down to hang the rake up.  I've had the pictures forever and was tired of them, but love the frames!  I had been to a friends house the other night and she had this cute earring holder made out of a window screen.  I just happen to have some.  I popped one picture out of the frame.  Cut a piece of window screen bigger than the opening and hot glued it in!  Oh my so easy!


 Of course this only works for dangle earrings, unless you want to pull the picture down to add Post earrings.


And, again....I think I need to go shopping. LOL,  I do have more than these, but they have clasp or post.

Saturday, January 9, 2016

Bracelet Holder

The day before my daughter was to go back to college, she announces that she wants me to make her a bracelet holder......I am like, are you kidding me.  My mind is racing!  How do I do that!  She says take a paper towel tube, cover it, put it on a base, simple.  And, I am thinking no, that will not work.  What do you do, when your not sure, GO to Pinterest!  So, I headed on over and found some examples and it was really simple to do.   And, she was right.


Here it is!


Supplies:

Base -found at Walmart 95 cents

Dowel- Walmart 95 cents

Paper Towel  tube

Magazine to roll up to put in tube

Fabric

Paint/Stain to paint base and dowel

Drill - to drill hole in base for dowel

Saw - to cut dowel

Exacto knife to cut hole in tube

Wood glue

Hot Glue gun


 Cut dowel the length desired, I cut mine 7 inches.  Drill hole in base big enough for dowel, but not to big.  It needs to be snug.  Glue with wood glue.  Let dry! After it dries, then stain or paint.

 Prepare paper towel roll, with fabric.  I used Hot Glue to glue edges, some use Modge Podge.  Roll up magazine and slide inside.  I folded my fabric on the ends and glued.  Some fold it inside and someone else cute a circle and glued on.  I had some wide sheer ribbon, that I used to cover the fabric and tied it off on each end.

 OK, now for the hard Part....REALLY.  Mark center on fabric roll (at the seam, seam will be down) and use knife to make a hole for dowel to slide inside.....I know you are thinking no big deal!  But, remember that magazine is in there.  I wanted my dowel to go in at least half way, so it would be secure.  When you get hole dug out, put hot glue in the hole, and place dowel 


Ta DA! Done!


Monday, November 9, 2015

Guest House Cont....from 3/2014

I wrote this last year 3/2014......This was my plan.  At the bottom is the reno!  And I think it turned out Fabulous!


 Last week we spent some time at our home in Arkansas.  If you have been following along, then you know that most of this blog is about that place.  Between the house and the barn is another building.  We don't know what it was used for, but I am guessing a work shop.  It has fluorescent bulbs from one end to the other and all the electrical outlets are table high.  It is a wonderful building for a workshop and maybe it will be left that way.  But, right now, I am thinking guest house/game room. Hmmm, I do love to work on some stuff and who knows, by the time we get to move there...I could change my mind. I do know this.  It will have a handicap accessible bathroom in it. But, before anything gets done to the inside, the outside has to be fixed up.


Here is the lovely building.....It has a new roof, but in need of paint and more.  I do have a plan...but it will done in phases, Number One...Money, Number Two....Time.

The Grand Plan is to Extend the roof line out to the end and.... 


I would like to add stone work, several feet up and Replace the single door with one like this.


 I would also like to add a portico.  Here are a couple of my inspiration links:
[houzz=http://www.houzz.com/photos/5677405/Old-Aurora--Ontario-craftsman-entry-toronto]

[houzz=http://www.houzz.com/photos/3979530/Exteriors-craftsman-garage-and-shed-los-angeles]

 Someones plan to divert water, Add lots of concrete....UGH! The concrete in front of the door actually slopes toward the building, thus the bottom of the door is rotten.

 Get rid of these doors and frame in a window to match the others. This concrete was actually in a good shape and we reused it at the barn.

 End view.
Replace the iron post with a cedar one.  Cover that pipe with lattice.  That pipe has wiring in it that goes to the barn.  It comes back down inside the building on the other end and then underground.  I guess it was to much trouble to bury all of it.  I would have loved to been on that brain storm.

 Last week, we (Bob and men help) started with getting rid of all that concrete.  And then, I spent the day on the tractor moving dirt.  I graded it so the water would hopefully run away from the building.  If the building site had been properly prepared to begin with......Well it wasn't, then instead of moving dirt, they poured concrete and did a poor job at that.   We got a rain while we were there, and it looks like it is working.


 The building has a concrete floor, except for the add on.  It is on floor joist.  After, we pulled the concrete, we discovered the front joist is termite eaten and rotting.  So, we will have to see about that.  That means call someone with experience with that kind of thing.


Summer 2015.....My husband could not put it off any longer!


First on the list was to start painting....and redo the trim around the windows.


 We made this lattice to cover that awkward electric pipe that ran up the front of the building.

Instead of putting stone across the front, we decided for a cheaper option. Tin! Cedar trim is not on yet

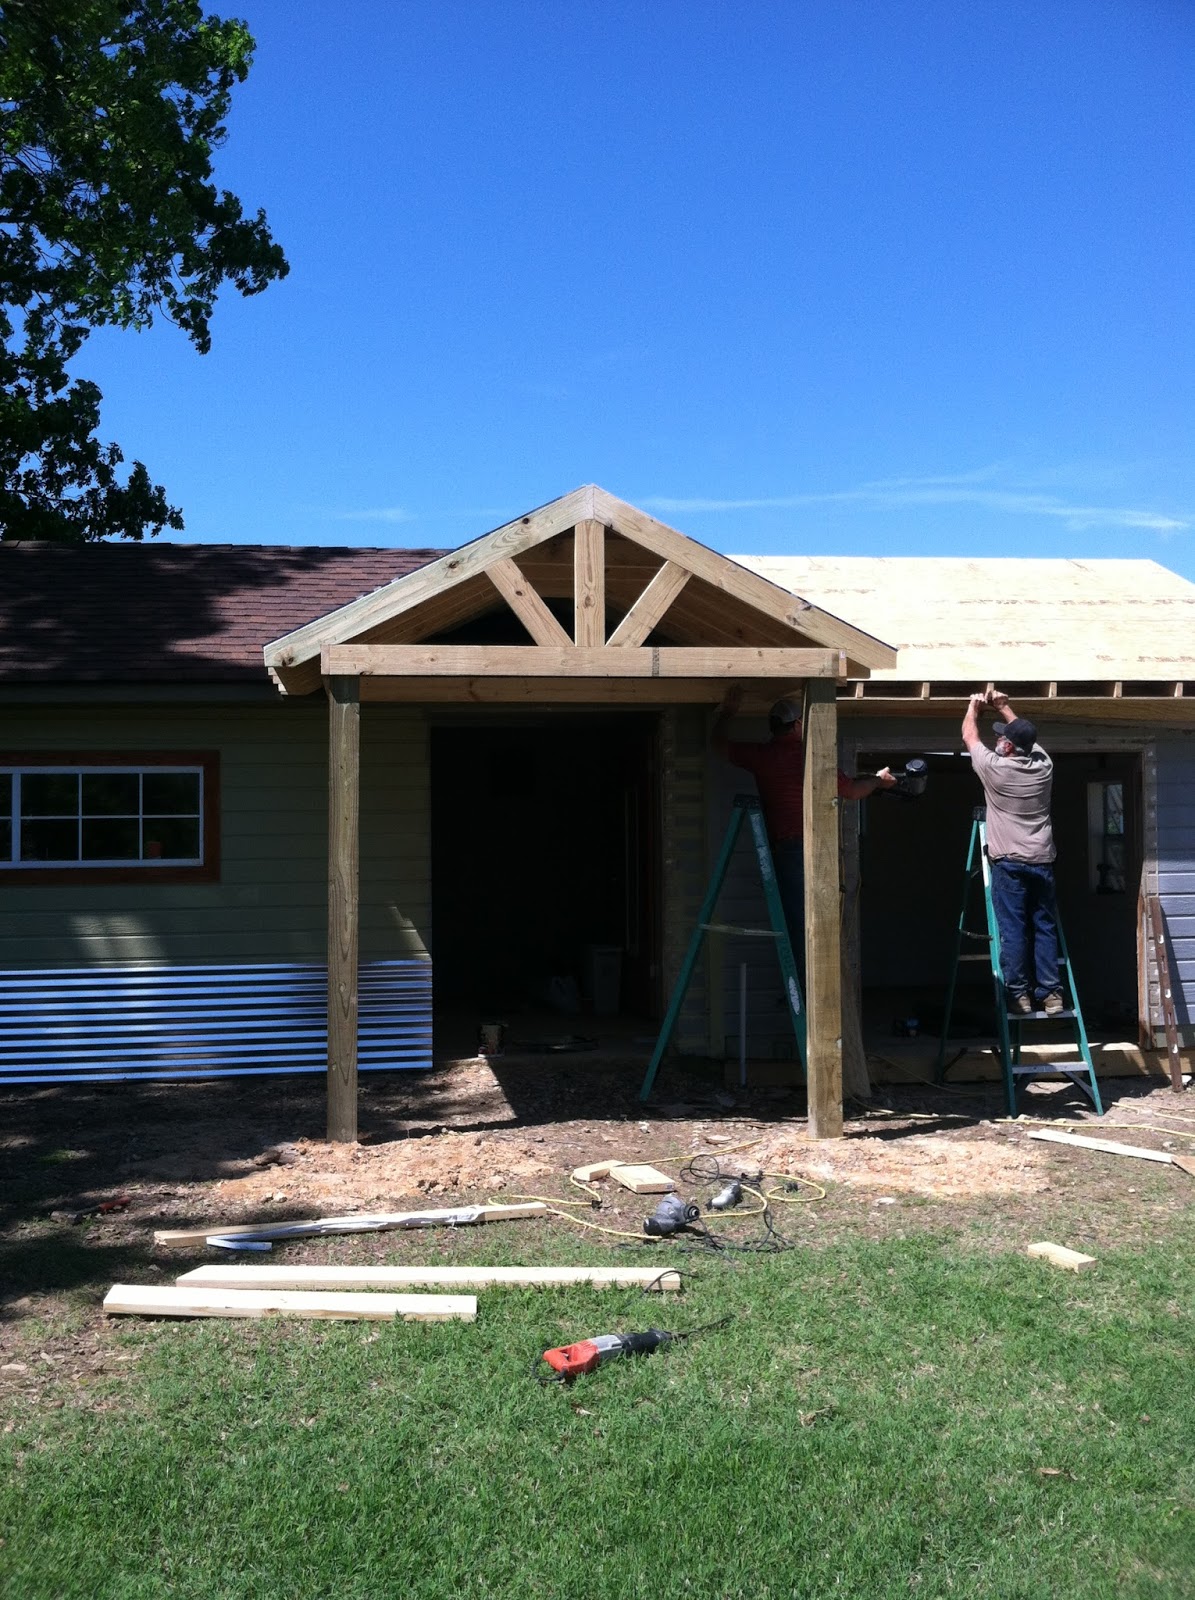
Time to call the professionals!  Luckily we have friends that are great carpenters!  Off with the shed roof to extend the gable roof.


They had to build up the wall to make it level...


And the porch


Of course a new door....

A new window...

I think it looks GREAT!

 
From this to That!
You have judge the cow thru the mud!


 Now, the inside, well that is a blank slate! But, curb appeal is awesome......