I struggled as to WHAT to do with this window. The dining room doesn't get much light, so I didn't want to block out what it does get. But, that window is huge and needed something to soften up the look. I finally decided on burlap. These were fun, easy and turned out really cute!
Check out the whole article under Labels - Curtains
Drop Cloth Curtains
I have been needing curtains for this sun room. Why? Some people don't want curtains in a sunroom, they want the sun to shine in. But, this room can get really warm, so curtains are a nice shield during Hot days. We only have three bedrooms, so it can serve as an extra guest room also. I have taken a nice nap on that futon, LOL.
I had just been unable to decide on something. I do that sometimes....think...look....and finally a light bulb clicks on for me. Two huge windows plus a smaller third one. I didn't want a lot of color because you look out into this room from the den and dining room. I needed something that wasn't going to cost me and arm and leg. I had seen these done before....Paint Drop Cloths. They were perfect, a 6 x 9, 8oz fabric for $9.99 from Lowes. I needed 5 of them. Add that up $50 bucks for a whole room of curtains, versus two panels. The rod and clips were the expensive part.
 |
| I like them! |
This is an EASY project.....OK, ironing out all the seams wasn't real easy. ( My mom even said so, LOL!) I folded mine over 16" at the top and pressed a nice seam, no sewing. Then I measured the distance I needed between clips and put a straight pen in, then when I got up on the ladder to hang, just clip and remove the straight pen. OK, I know what you are thinking.....Why didn't you just put the clips onto the curtains in the first place? The rod brackets are circles, the rod has to slid thru the circle. They are not the brackets that just hold the rod. The clips have to be on the rod when hung. Unless, you have room to pull your rod apart in the middle, you could put the clips onto the curtains and then slide them onto the rod. I didn't have room to work. See that corner?
Eight ounce fabric is pretty heavy. I am glad I didn't go with the 10oz. You do have to kinda work with it when pulling the curtains back.
 |
| This rod, brackets & clips had the installed all in one piece. |
Blue Jean Organizer
Actually, this is a NO SEW! Fabric glue can be your best friend!
I know you have some....Old Jeans....What to do with them? Actually I have seen a number of cute projects done with jeans. I have seen purses, quilts, ottoman covers, and a Supply holder. Which is what I did with some that we had. I have a extra room that is Multi-purpose. The room serves as a guest bedroom, and it has a tanning bed, exercise equipment, sewing machine and a closet full of crafts and BeautiControl. When, I am working on a project, I set up a table.
Like I said, I have a closet full, so I wanted pens, rulers, small stuff easy to get to and not have to dig thru something to find them. I hung this on the back of the closet door. Cute, Isn't it?
 | ||||
| Finished product |
 | |
| The back |
***********************************************************************************
Floor Pouf
Oh my, I am not a seamtress. My mother on the other hand can sew anything. She tried and tried to teach me, but the simple Sew Today, Wear Tomorrow patterns, Hmmm I would be working on for days. Now, I could sit down and draw up a purse pattern and sew one right up. But clothes, Nope. Any way, my mom has seemed to collect some sewing machines and she thought I needed to have one. The other day, I was on the internet browsing the Better Homes & Gardens site and saw a floor Pouf. And, I thought, I have some fabric, I have some filler, and I have a sewing machine. I printed out the pattern and went to work. You can find it at bhg.com/pouf
First, I didn't read all the instructions......
 |
| I had this fabric from some samples. I used 3 different ones. |
 |
| Since I didn't have enough for the whole piece, I only did the rectangle different. |
 |
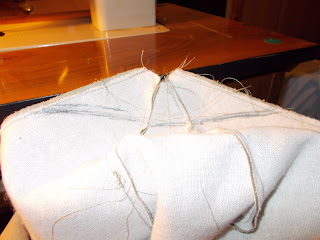
| Hmmm, I have a problem, I don't think it is suppose to look like that. |
 |
| So, I take all the stuffing out! And, I sew straight across the bottom |
 | |
| So now , I have to figure out how to fix the top.... |
 |
| So I pinned the seams thicker and hand sewed...:( |
 |
| Now, I realize.....I was suppose to have 8....yes 8 sides, not 6 |
 |
| So since the angles weren't going to match up, I just made a circle. |
 |
| Then I sewed the circle on using their fancy instructions |
 |
| You know, I think it turned out ok...I mean I am NOT a seamtress :) |
**********************************************************************************
Burlap Wine Bags and Monogram Picture Frames
I have been working on Christmas presents. It seems the in thing is Burlap. I am never in, when things are in style, but I guess this is a first. I am loving some burlap. Fortunately for me, my maiden name is Williams, and my sister-in-law married a Williams, so lots of W's in the family. Instructions for the wine bag below.
 |
| Wine bags! |
 |
| Picture frames with Initials! I love these and will be doing one for us! |
 |
| Guess what? These frames were painted! |
Making the wine bags was so easy! Supplies: Ruler, Scissors, Tacky Glue, Straight pens, Burlap, Raffia.
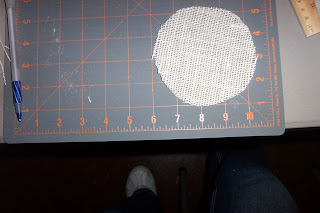
1. Cut your burlap 12" x 12" and a 5" circle, I used a coffee mug to make draw mine out.
2. Put your monogram on. 5" below the top of bag. And my letter you can see is a little over 2" tall. Let it dry.
3. Then you will fold over this piece and glue down the edges. Let it dry. You can pull some of the loose strings out.
4. Then take your straight pens and pen the bottom on, leaving your seam on the outside. I put my hand down inside the bag with the bottle of glue and applied it all around the bottom. Then, I placed a wine bottle in bag (so it would stand up), place the bag on wax paper and mash down on your seam, making it lay flat all the around. After it dries, take your pens out and make sure it is glued snug. I did have to touch up a few spots.
 |
| sorry bad picture. |
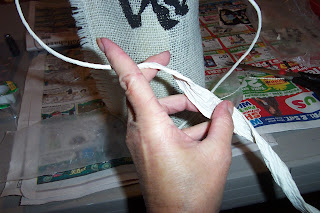
5. Then I took the raffia and just pushed it through the burlap a the wine bottle neck height.
6. Unravel it and tie a bow and done. The most consuming part of this project is waiting on the glue to dry.
 |
| I think their cute! |


It turned out just fine!! You are so brave to tackle this one; must be way more of a seamstress than i am. Well I know you are, because you went after a project that requires a pattern!!! And you are a true crafter that can figure out how to proceed after making an "error", or rather, an "opportunity to make it your own"!!
ReplyDeleteLOL! Thanks!
Delete