Barnominium

Barnominium

Monday, November 9, 2015

Guest House Cont....from 3/2014

I wrote this last year 3/2014......This was my plan.  At the bottom is the reno!  And I think it turned out Fabulous!


 Last week we spent some time at our home in Arkansas.  If you have been following along, then you know that most of this blog is about that place.  Between the house and the barn is another building.  We don't know what it was used for, but I am guessing a work shop.  It has fluorescent bulbs from one end to the other and all the electrical outlets are table high.  It is a wonderful building for a workshop and maybe it will be left that way.  But, right now, I am thinking guest house/game room. Hmmm, I do love to work on some stuff and who knows, by the time we get to move there...I could change my mind. I do know this.  It will have a handicap accessible bathroom in it. But, before anything gets done to the inside, the outside has to be fixed up.


Here is the lovely building.....It has a new roof, but in need of paint and more.  I do have a plan...but it will done in phases, Number One...Money, Number Two....Time.

The Grand Plan is to Extend the roof line out to the end and.... 


I would like to add stone work, several feet up and Replace the single door with one like this.


 I would also like to add a portico.  Here are a couple of my inspiration links:
[houzz=http://www.houzz.com/photos/5677405/Old-Aurora--Ontario-craftsman-entry-toronto]

[houzz=http://www.houzz.com/photos/3979530/Exteriors-craftsman-garage-and-shed-los-angeles]

 Someones plan to divert water, Add lots of concrete....UGH! The concrete in front of the door actually slopes toward the building, thus the bottom of the door is rotten.

 Get rid of these doors and frame in a window to match the others. This concrete was actually in a good shape and we reused it at the barn.

 End view.
Replace the iron post with a cedar one.  Cover that pipe with lattice.  That pipe has wiring in it that goes to the barn.  It comes back down inside the building on the other end and then underground.  I guess it was to much trouble to bury all of it.  I would have loved to been on that brain storm.

 Last week, we (Bob and men help) started with getting rid of all that concrete.  And then, I spent the day on the tractor moving dirt.  I graded it so the water would hopefully run away from the building.  If the building site had been properly prepared to begin with......Well it wasn't, then instead of moving dirt, they poured concrete and did a poor job at that.   We got a rain while we were there, and it looks like it is working.


 The building has a concrete floor, except for the add on.  It is on floor joist.  After, we pulled the concrete, we discovered the front joist is termite eaten and rotting.  So, we will have to see about that.  That means call someone with experience with that kind of thing.


Summer 2015.....My husband could not put it off any longer!


First on the list was to start painting....and redo the trim around the windows.


 We made this lattice to cover that awkward electric pipe that ran up the front of the building.

Instead of putting stone across the front, we decided for a cheaper option. Tin! Cedar trim is not on yet

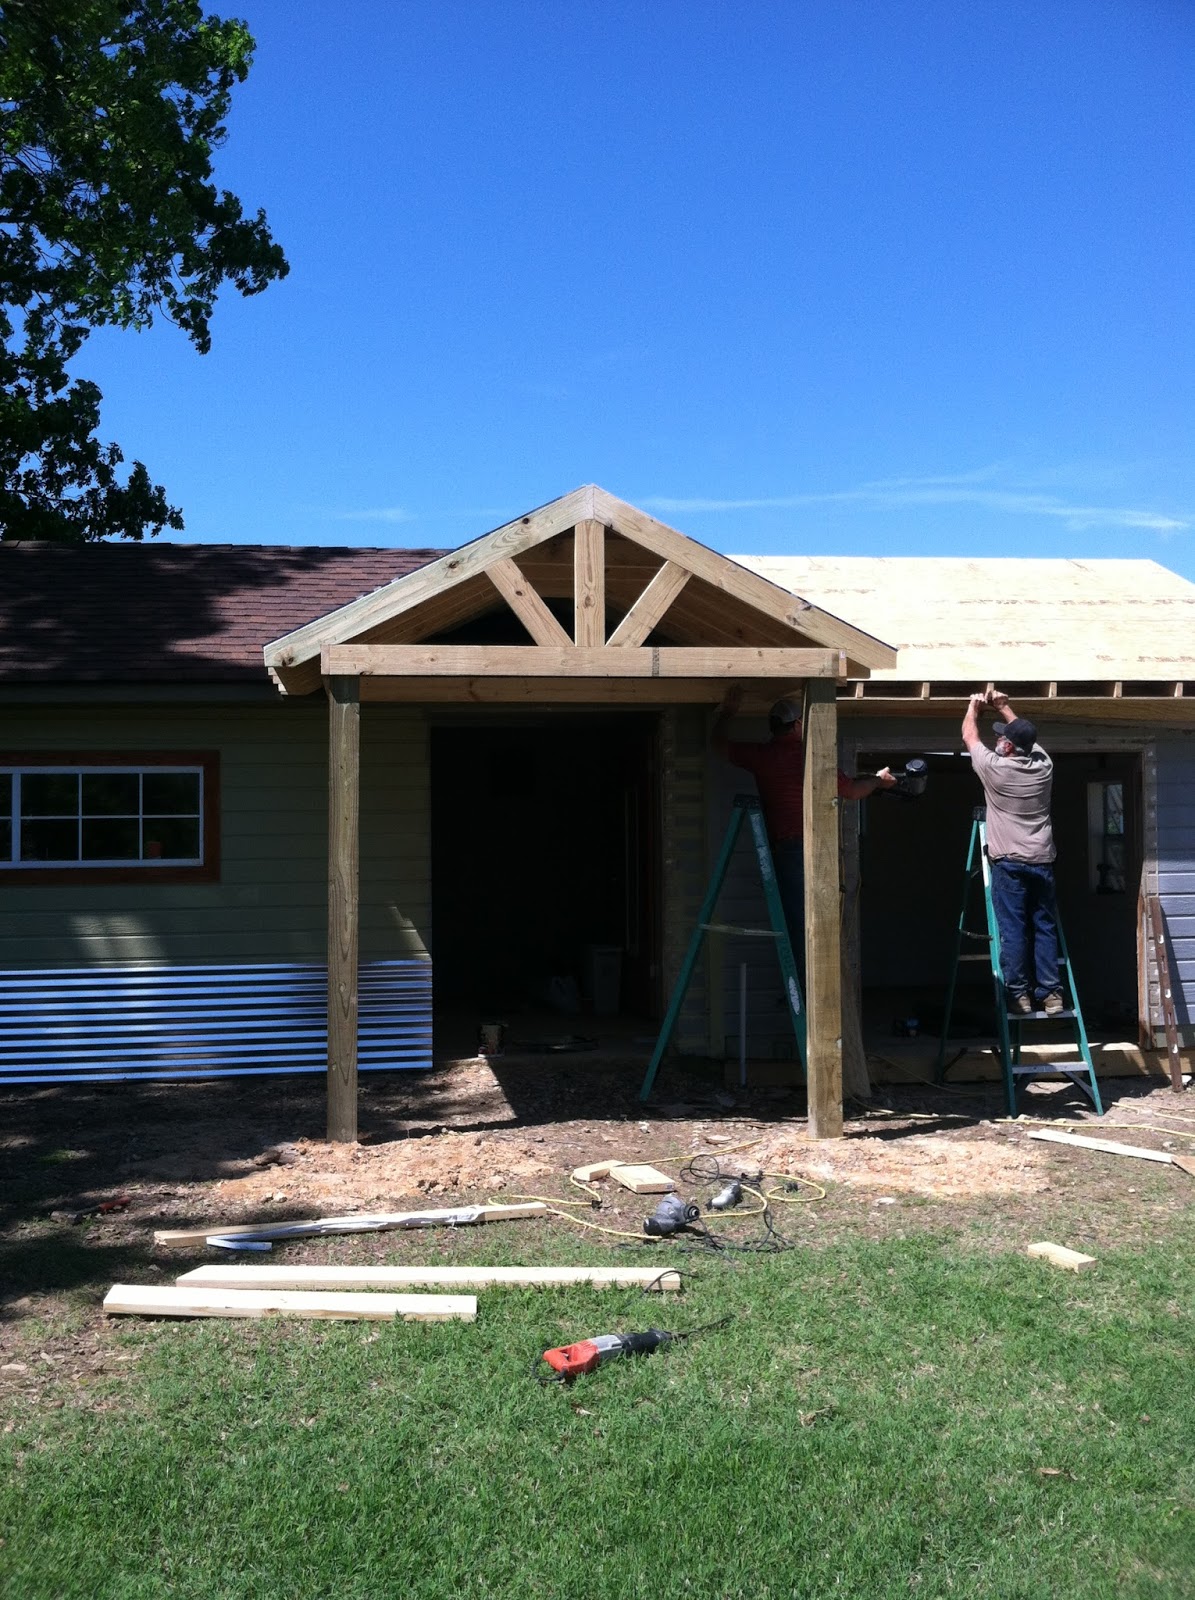
Time to call the professionals!  Luckily we have friends that are great carpenters!  Off with the shed roof to extend the gable roof.


They had to build up the wall to make it level...


And the porch


Of course a new door....

A new window...

I think it looks GREAT!

 
From this to That!
You have judge the cow thru the mud!


 Now, the inside, well that is a blank slate! But, curb appeal is awesome......

Tuesday, October 27, 2015

Dry Erase Board

The EASIEST Craft ever.....Make your own Erase Board.

supplies needed:

A Picture Frame with Glass
Fabric/Scrapbook paper to go behind glass
A dry Erase Pen

Ta DA!
I love the board that I have hanging in my kitchen.  When you run out of something, put it on the board. It just makes life easier!


Wednesday, September 9, 2015

Cheap Table & Chairs, Ugly to Cute!

The hunt was on for CHEAP furniture for my daughter's college apartment!  I started following a lot of swap sites on Facebook and checking Craigslist.  Things are posted day and night, and some people just want it gone, so you have to be FAST! I just happened to be looking when the Table was posted.


 Sorry, I had already flipped it upside down, to tighten things up, when I decided to take a picture!  UGLY! Right?  Well the table and 4 chairs was $50.  The table is a perfect apartment size 30" x 48" and it has a little leaf on each end that pulls out and makes the table 60" long.


 These were my inspiration!  I thought colored chairs would be good to add POP to an apartment!


                        After tightening up screws and some wood glue, I just painted the legs.

                                              
                                                              And then distressed it!


I needed to find fabric to cover the seats on the chairs, so I would know what color to paint them.
I scored this at Hobby Lobby on clearance.


                                                           Chairs are distressed too.....


After, I took the seats off the chairs, I realized that I would have to cut out new ones.  The wood was really thin and cracked in a number of places.  I happened to have some 3/4 chip board laying around that used for new seats.  I used one of the old ones for a pattern.  The old ones were just covered with a thin cotton batting.  I wanted plush.  I went to an upholstery store and bought foam.  I cut the foam
3/4" bigger around then the plywood.  Then I used cotton batting to cover the foam and stapled to bottom of the seat.  Then attached the fabric the same way.  Sorry!  Should have taken pictures.


 And, Here it is in the apartment.  A perfect size for their space.  I am sorry for the poor quality pictures.  The lighting was terrible and the sun was shining through the blind. Looks pretty good for about $100 investment.  Table $50, Foam, Fabric & Paint - about $50


Tuesday, September 8, 2015

FREE couch, Cheap Fix for Cat damage!

The first year off to college involved getting all the stuff needed for a dorm room.  Last year it just involved getting said stuff back to school and up to the 5th floor.  This year, she got an apartment with a roommate.  So, this summer, I worked on finding furniture on the cheap!

The first item I scored was a FREE couch.  Yeah me!  His cat had done some damage to one of the arms.  

                                                       This is the end of the couch.

 I used a piece of fabric that I had, that was close in color and the spray adhesive to put in behind tear.
And then because the front of the arm was also messed up.....I actually cut several more strings off and glued on top.  Yes, you can see it in the close up, but is really not noticable.

 Then, I took some newspaper and made a pattern of the front of the arm and cut the leather tooled look fabric out.  Again, I attached with the spray adhesive.


                               Then, I used Upholstery Brads around the edges to dress it up.


                                        Here it is in the apartment.  It turned out GREAT!